Apptainer: Getting started
Overview
Teaching: 30 min
Exercises: 20 minQuestions
What is Apptainer and why might I want to use it?
What issues motivated the creation of Apptainer?
What are the differences between Docker, Apptainer, and Singularity?
Objectives
Understand what Apptainer is and when you might want to use it.
Learn the design goals behind Apptainer.
What is it?
Apptainer is a container platform that allows software engineers and researchers to easily share their work with others by packaging and deploying their software applications in a portable and reproducible manner.
When you download an Apptainer container image, you essentially receive a virtual computer disk that contains all of the necessary software, libraries and configuration to run one or more applications or undertake a particular task, e.g. to support a specific research project.
This saves you the time and effort of installing and configuring software on your own system or setting up a new computer from scratch, as you can simply run an Apptainer container from the image and have a virtual environment that is identical to the one used by the person who created the image.
To visualize what containers are offering, let’s consider one division of the different layers of what a software package’A’ needs in order to run. You need to provide some hardware in the form of a computer with a CPU, RAM, disk space, and other similar resources. Then, you need to install an operating system (OS) on this hardware, such as CentOS. With the operating system installed, you can install the binaries and libraries that your software ‘A’ depends on. Finally, you can installand use software ‘A’ itself.
This workflow is OK for personal workstations, or other single-user machines. It has worked for decades, after all. But you can run into a few different issues that make it less than ideal for some workflows:
- Installing and configuring the dependencies of a package can be complicated and time-consuming
- What if you want to run the same software package at different computing centers? Now you have to duplicate the setup/installation work from scratch
- Not all software is available for every OS, so you might need multiple workstations or to multiboot in order to install all of the software you want
- In a shared user environment like MSI, you have more limited control over dependencies and no control over the OS or hardware
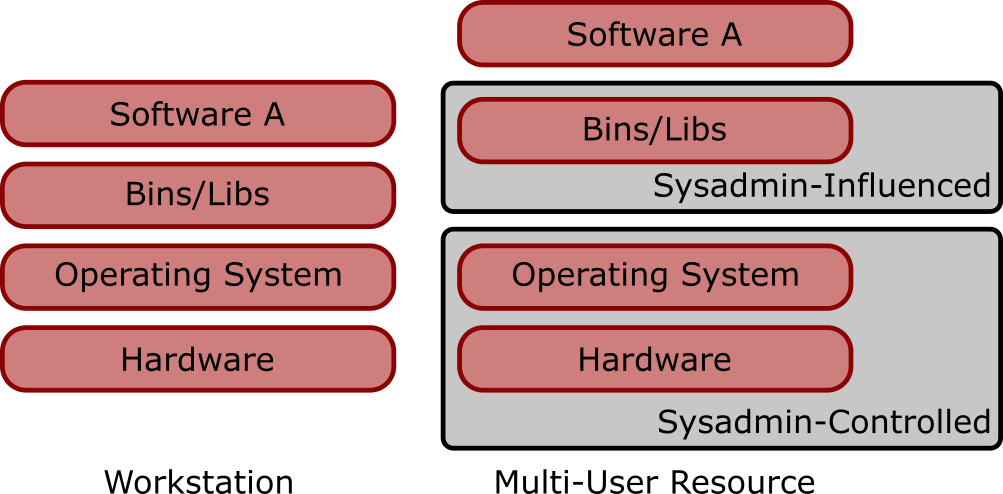
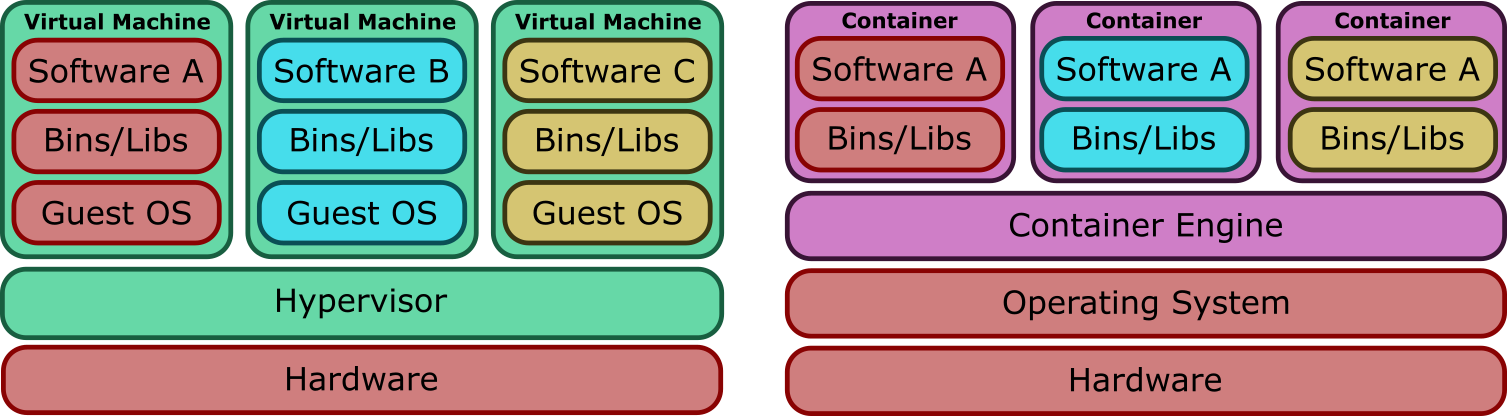
There are a couple of common ways to deal with these issues - virtual machines (VMs) and containers. Conceptually these two solutions are similar - isolate the environment you want to manage away from the host system, so you can run multiple independent environments. They differ a bit in implementation, however. While a VM-based solution requires each environment to run its own independent operating system, a container-based solution provides a translation layer between the environment and the host operating system. The specifics of this go a bit beyond the intended scope of today’s material, but this has two important high-level consequences that make containers the more appealing solution for MSI:
- The relationship between the VM guest OS and hypervisor creates security and privacy concerns in a shared environment
- Using a container is less complex than using a VM because you don’t have to provide and configure an entire OS
Images and containers
A brief note on the terminology used in this section of the course. We refer to both images and containers. What is the distinction between these two terms?
Images are bundles of files including an operating system, software and potentially data and other application-related files. They may sometimes be referred to as a disk image or container image and they may be stored in different ways, perhaps as a single file, or as a group of files. Either way, we refer to this file, or collection of files, as an image.
A container is a virtual environment that is based on an image. That is, the files, applications, tools, etc that are available within a running container are determined by the image that the container is started from. It may be possible to start multiple container instances from an image. You could, perhaps, consider an image to be a form of template from which running container instances can be started.
Many solutions are available for working with containers. One of the more common ones you may have heard about is Docker, which was developed for enterprise infrastructure workloads. You might have even used Docker to run some containers on a personal workstation, as it can be a good fit for that type of workflow as well. It isn’t a good fit for running HPC workflows, however, due to some security and feature restrictions imposed by its design.
Apptainer is an alternative container platform created specifically for the HPC use case. It allows users to build and run containers with just a few steps in most of the cases, and its design presents key concepts for the scientific community:
- Single-file based container images, facilitating distribution, archiving and sharing.
- Security model compatible with multi-user shared resources (no root permissions needed to run it, permissions preserved inside the container)
- Simple integration with resource managers and distributed computing frameworks because it runs as a regular application.
Apptainer vs Singularity
In these lessons you see the name Apptainer or Apptainer/Singularity, and the command apptainer.
As stated in the move and renaming announcement, “Singularity IS Apptainer”.
Currently there are three products derived from the original Singularity project from 2015:
- Singularity: commercial software by Sylabs.
- SingularityCE: open source Singularity supported by Sylabs.
- Apptainer: open source Singularity, recently renamed and hosted by the Linux Foundation. As of Fall 2022 all three Apptainer/Singularity versions are compatible and practically the same, but have different roadmaps. There is hope that in the future they will join forces, but this is not currently the case. To understand how this came to be you can read the Singularity history on Wikipedia.
MSI provides Apptainer, the most adopted variation in the scientific community, so we are using the apptainer command.
If you are using Singularity or SingularityCE, just replace the command apptainer with singularity and the
APPTAINER_ and APPTAINERENV_ variable prefixes with SINGULARITY_ and SINGULARITYENV_.
But since its previous version was named Singularity and the developers wanted backwards-compatibility, if you have older scripts still using the singularity command they will work also in Apptainer because it is providing the singularity alias
and full compatibility with the previous Singularity environment.
Documentation
The official Apptainer documentation is available online. Contains basic and advanced usage of Apptainer beyond the scope of this training document. Take a look and read the nice introduction, explaining the motivation behind the creation of Apptainer.
Key Points
Apptainer is a container platform designed by and for scientists.
Apptainer has a different security model to other container platforms, one of the key reasons that it is well suited to HPC and cluster environments. User inside the container = user outside.
Apptainer/Singularity has its own container image format (SIF).
Containers and Images
Overview
Teaching: 20 min
Exercises: 5 minQuestions
How to pull Apptainer images from the libraries?
How to run commands inside the containers?
Objectives
Learn to search and pull images from the Sylabs Singularity library and Docker Hub.
Interact with the containers using the command-line interface.
Apptainer is a Module at MSI
MSI provides a modulefile for Singularity and Apptainer. Currently we provide this module under both naming conventions, so you can load it by running either of the equivalent commands:
module load apptainer
or
module load singularity
But it is already available?
You may notice that the
singularityandapptainercommands are available before you load the module. This is because due to some peculiarities with how this software interacts with the permissions model on our network storage, we are not always able to use a regular module-based deployment method. However, the module-based deployment is the intended workflow and you should get used to loading the module before using Apptainer.
The Apptainer Command Line Interface
Apptainer provides a command-line interface (CLI) to interact with the containers. You can search, build or run containers in a single line.
You can check the version of the Apptainer or Singularity command you are using with the --version option:
singularity --version
# This works for both Singularity and Apptainer, which installs a link named `singularity` to maintain compatibility.
# In the future you may need to use `apptainer --version`
For this training we recommend Apptainer >= 1.0 or Singularity >= 3.5. Older versions may not have some of the features or behave differently. If you need to install or upgrade Apptainer/Singularity please refer to the Setup section. When asking for support please remember to include the version of Apptainer or Singularity being used, as in the output of the above commands.
You can check the available options and subcommands using --help:
apptainer --help
Downloading Images
Apptainer can store, search and retrieve images in registries. Images built by other users can be accessible using the CLI, can be pulled down, and become containers at runtime.
Sylabs, the developers of one Singularity flavor, hosts a public image registry, the Singularity Container Library where many user built images are available.
Configuring the Sylab Registry
The Linux Foundation flavor, Apptainer, does not point by default to the Sylab registry as previous versions did. MSI configures its Apptainer installation to provide the Sylab registry, but if you are running on other resources you may need to add it yourself. You can do so by running these commands (documented here):
apptainer remote add --no-login SylabsCloud cloud.sycloud.ioINFO: Remote "SylabsCloud" added.apptainer remote use SylabsCloudINFO: Remote "SylabsCloud" now in use.
You can see the currently configured registries by running:
apptainer remote list
Cloud Services Endpoints
========================

NAME           URI                  ACTIVE  GLOBAL  EXCLUSIVE
DefaultRemote  cloud.apptainer.org  NO      YES     NO
SylabsCloud    cloud.sycloud.io     YES     NO      NO
...
Once you have confirmed (or setup) a working registry you can use search and pull.
The command search lists containers of interest
and shows information about groups and collections. For example:
# this command can take around a minute to complete
apptainer search centos7
No users found for 'centos7'

Found 1 collections for 'centos7'
        library://shahzebmsiddiqui/easybuild-centos7

Found 15 containers for 'centos7'
        library://gmk/default/centos7-devel
                Tags: latest
...
What if the search times out?
It is fairly common for the no-login access to the Sylabs cloud to take a while to respond, and possible time out before the search can complete. In these cases, you can get at the same information in a web browser by searching their library website
Downloading an image from the Container Library is pretty straightforward:
apptainer pull library://gmk/default/centos7-devel
and the image is stored locally as a .sif file (centos7-devel_latest.sif, in this case).
Docker Images
Fortunately, Apptainer is also compatible with Docker images. There are many more registries with Docker images. Docker Hub is one of the largest libraries available, and any image hosted on the hub can be easily downloaded with the
docker://URL as reference:apptainer pull docker://centos:centos7
Running Containers
There are several ways to interact with images and start containers. Here we will review how to initialize a shell environment and how to execute directly a command.
Initializing a shell and exiting it
The shell command initializes a new interactive shell inside the container.
apptainer shell centos7-devel_latest.sif
Apptainer>
In this case, the container works as a lightweight virtual machine in which you can execute commands. Remember, inside the container you have the same user and permissions.
Apptainer> id
uid=1001(myuser) gid=1001(myuser) groups=1001(myuser),500(myothergroup)
Now quit the container by typing
Apptainer> exit
or hitting Ctrl + D.
Note that when exiting from the Apptainer image all the running processes are killed (stopped).
Changes saved into bound directories are preserved. By default anything else in the container is lost (we’ll see later about writable images).
Bound directories
When an outside directory is accessible also inside Apptainer we say it is bound, or bind mounted. The path to access it
may differ but anything you do to its content outside is visible inside and vice-versa.
By default, Apptainer binds the home of the user, /tmp and $PWD into the container. This means your files
at hostname:~/ are accessible inside the container. You can specify additional bind mounts using the --bind option.
For example, let’s say /scratch.global is available in the host, and you would like to have access to global scratch inside the
container (here, host refers to the computer/server that you are running apptainer on). Then let’s do
apptainer shell --bind /scratch.global:/mnt centos7-devel_latest.sif
Here, the colon : separates the path to the directory on the host (/scratch.global/) from the mounting point (/mnt/) inside of the container.
More information on binding is provided later.
Let’s check that this works:
Apptainer> ls /mnt/$USER
bin                        etc                  SITECONF           slc7_aarch64_gcc530
bootstrap.sh               external             slc5_amd64_gcc434  slc7_aarch64_gcc700
...
URLs as input
Each of the different commands to set a container from a local
.sifalso accepts the URL of the image as input. For example, starting a shell with Scientific Linux 6 is as easy asapptainer shell docker://sl:62020/12/17 21:42:46 info unpack layer: sha256:e0a6b33502f39d76f7c70213fa5b91688a46c2217ad9ba7a4d1690d33c6675ef INFO: Creating SIF file... Apptainer>
Executing commands
The command exec starts the container from a specified image and executes a command inside it.
Let’s use the official Docker image of ROOT to start ROOT
inside a container:
apptainer exec docker://rootproject/root root -b
INFO:    Converting OCI blobs to SIF format
INFO:    Starting build...

   ------------------------------------------------------------------
  | Welcome to ROOT 6.22/06                        https://root.cern |
  | (c) 1995-2020, The ROOT Team; conception: R. Brun, F. Rademakers |
  | Built for linuxx8664gcc on Nov 27 2020, 15:14:08                 |
  | From tags/v6-22-06@v6-22-06                                      |
  | Try '.help', '.demo', '.license', '.credits', '.quit'/'.q'       |
   ------------------------------------------------------------------

/bin/bash: warning: setlocale: LC_ALL: cannot change locale (en_US.UTF-8)
root [0]
And just like that, ROOT can be used in any laptop, large-scale cluster or grid system with Apptainer available.
Execute Python with PyROOT available
Using the official Docker image of ROOT, start a Python session with PyROOT available.
Solution
apptainer exec docker://rootproject/root python3INFO: Using cached SIF image Python 3.8.5 (default, Jul 28 2020, 12:59:40) [GCC 9.3.0] on linux >>> import ROOT >>> # Now you can work with PyROOT, creating a histogram for example >>> h = ROOT.TH1F("myHistogram", "myTitle", 50, -10, 10)
Key Points
Use
apptainer --versionorsingularity --versionto know what you are using and to communicate it if asking for supportA container can be started from a local
.sifor directly with the URL of the image.Apptainer is also compatible with Docker images, providing access to the large collection of images hosted by Docker Hub.
Get a shell inside of your container with
apptainer shell <path/URL to image>Execute a command inside of your container with
apptainer exec <path/URL> <command>Bind outside directories with
--bind
The image cache
Overview
Teaching: 10 min
Exercises: 0 minQuestions
Why does Apptainer use a local cache?
Where does Apptainer store images?
Objectives
Learn about Apptainer’s image cache.
Learn how to manage Apptainer images stored locally.
Apptainer’s image cache
While Apptainer doesn’t have a local image repository in the same way as, for instance, Docker, it does cache downloaded image files. As we saw in the previous episode, images are simply .sif files stored on your local disk.
If you delete a local .sif image that you have pulled from a remote image repository and then pull it again, if the image is unchanged from the version you previously pulled, you will be given a copy of the image file from your local cache rather than the image being downloaded again from the remote source. This removes unnecessary network transfers and is particularly useful for large images which may take some time to transfer over the network. To demonstrate this, remove the hello-world.sif file stored in your test directory and then issue the pull command again:
$ rm centos7-devel_latest.sif
$ apptainer pull library://gmk/default/centos7-devel
INFO: Use image from cache
As we can see in the above output, the image has been returned from the cache and we don’t see the output that we saw previously showing the image being downloaded from the Container Library.
How do we know what is stored in the local cache? We can find out using the apptainer cache command:
$ apptainer cache list
There are 2 container file(s) using 953.56 MiB and 7 oci blob file(s) using 795.96 MiB of space
Total space used: 1.71 GiB
This tells us how many container files are stored in the cache and how much disk space the cache is using but it doesn’t tell us what is actually being stored. To find out more information we can add the -v verbose flag to the list command:
$ apptainer cache list -v
NAME                     DATE CREATED           SIZE             TYPE
3153aa388d026c26a2235e   2023-11-29 11:43:11    28.17 MiB        blob
4f4fb700ef54461cfa0257   2023-11-29 11:43:10    0.03 KiB         blob
a92e1499ab2116def52960   2023-11-29 11:43:20    1.01 KiB         blob
adcfc5ae21e02d2a4e0611   2023-11-29 11:43:20    3.99 KiB         blob
cd4f73f3be7df86c541481   2023-11-29 11:43:20    600.84 MiB       blob
e9d9ea00e81a9ebf9a6a5d   2023-11-29 11:43:13    166.94 MiB       blob
fc99e5b541a5d800e7a738   2023-11-29 11:43:11    0.37 KiB         blob
sha256.740fa5a3d1a2019   2023-11-29 11:42:32    296.19 MiB       library
3dd56175ed0c777d5dda16   2023-11-29 11:44:39    657.37 MiB       oci-tmp

There are 2 container file(s) using 953.56 MiB and 7 oci blob file(s) using 795.96 MiB of space
Total space used: 1.71 GiB
This provides us with some more useful information about the actual images stored in the cache. There are a few different types of item that are cached here, blob, oci-tmp and library.
The most numerous type, blob, is a type of file that are combined to create a final container image. We most frequently see them when pulling from a docker:// source, and they can usually be removed unless you are pulling many closely related images that may share blobs. These blobs are combined into an SIF format image that will be listed as the type oci-tmp. So all of the blobs and the oci-tmp entry are related to the ROOT image that we just downloaded.
Any other cached item that isn’t a blob or an image in oci-tmp will be a SIF format image that is named according to where it was downloaded from. So the remaining entry in our list has the image type is library because it’s a SIF image that has been pulled from the Container Library.
Cleaning the Apptainer image cache
We can remove images from the cache using the
apptainer cache cleancommand. Running the command without any options will display a warning and ask you to confirm that you want to remove everything from your cache.You can also remove specific images or all images of a particular type. Look at the output of
apptainer cache clean --helpfor more information.One of the more common operations might be to clean out all of the blobs that you no longer need, which you can accomplish via:
apptainer cache clean -T blob
Cache location
By default, Apptainer uses
$HOME/.apptainer/cacheas the location for the cache. You can change the location of the cache by setting theAPPTAINER_CACHEDIRenvironment variable to the cache location you want to use.The labels in the
TYPEcolumn of the cache correspond to subdirectories of the Apptainer cache, and you can get more information about a specific entry by usingapptainer inspecton the a specific file. For instance, if we want to inspect thelibraryentry from the above output, we could run:$ apptainer inspect ~/.apptainer/cache/library/sha256.740fa5a3d1a2019*
Key Points
Apptainer caches downloaded images so that an unchanged image isn’t downloaded again when it is requested using the
apptainer pullcommand.You can free up space in the cache by removing all locally cached images or by specifying individual images to remove.
Building Containers
Overview
Teaching: 40 min
Exercises: 30 minQuestions
How to build containers with my requirements?
Objectives
Download and assemble containers from available images in the repositories.
Running containers from the available public images is not the only option. In many cases, it is required to modify
an image or even to create a new one from scratch. For such purposes, Apptainer provides the command build,
defined in the documentation as the Swiss army knife of container creation.
The usual workflow is to prepare and test a container in a build environment (like an interactive SLURM job), either with an interactive sandbox or from a definition file, and then to deploy the container into a production environment for execution. Interactive sandboxes are great to experiment and test your new container. If you want to distribute the container or use it in production, then we recommend to build it from a definition file, as described in the next episode. This ensures the greatest possibility of reproducibility and transparency.
Build a container in an interactive session
Notes on shared file systems
Avoid using network storage as a sandbox directory, as these systems can lead to permissions issues and very slow performance. At MSI, this applies to your home directory, group storage, and global scratch. Instead, use the local storage available inside a SLURM job via the
--tmpflag. You can then work out of this directory for the duration of the job, but make sure to copy any results you want to save out of/tmpbefore the end of the job or it will be deleted.
Let’s request some resources from SLURM, so that we have local storage and can run longer build processes than would be possible on our login nodes.
salloc --time=6:00:00 --nodes=1 --ntasks-per-node=8 --partition=amdsmall,amdlarge --cluster=mesabi --tmp=48gb --mem=16g
salloc: Setting account: dunn0404
salloc: Pending job allocation 160383731
salloc: job 160383731 queued and waiting for resources
salloc: job 160383731 has been allocated resources
salloc: Granted job allocation 160383731
salloc: Waiting for resource configuration
salloc: Nodes cn1122 are ready for job
ssh cn1122
cd /tmp
module load apptainer
While images contained in the .sif files are more compact and immutable objects, ideal for reproducibility, for building and testing images in more convenient the use of a sandbox, which can be easily modified.
The command build provides a flag --sandbox that will create a writable directory, myCentOS7, in your work directory:
apptainer build --sandbox myUbuntu docker://ubuntu:20.04
mkdir myUbuntu/users
chmod -R a=rwX myUbuntu
The container name is myUbuntu, and it has been initialized from the official Docker image
of Ubuntu 20.04
We had to do a little extra setup for the sandbox because of some permissions peculiarities, by creating the users directory for the sandbox and changing the permissions for the whole sandbox.
To initialize an interactive session use the shell command. And to write files within the sandbox directory use the --writable option.
Finally, the installation of new components will require superuser access inside the container, so use also the --fakeroot option, unless you are already root also outside.
apptainer shell --writable --fakeroot myUbuntu
Apptainer> whoami
root
Depending on the Apptainer installation (privileged or unprivileged) and the version, you may have some requirements, like the fakeroot utility or newuidmap and newgidmap.
If you get an error when using --fakeroot have a look at the fakeroot documentation. MSI is currently using fakeroot for Apptainer on our clusters.
--fakerootis not rootATTENTION!
--fakerootallows you to be root inside a container that you own but is not changing who you are outside. All the outside actions and the writing on bound files and directories will happen as your outside user, even if in the container is done by root.
As an example, let’s create a container with hmmer 3.4 available using the myUbuntu sandbox.
First, we need to install the development tools (remember that in this interactive session we are superuser):
Apptainer> apt update
Apptainer> apt install build-essential wget
Where apt is the package manager used in Debian distributions
(like Ubuntu).
We will follow the a modified version of the installation steps described in the hmmer website. Here is a summary of the commands you will need (you may need to adjust link and commands if there is a new Hmmer version):
Apptainer> mkdir /opt/hmmer && cd /opt/hmmer
Apptainer> wget http://eddylab.org/software/hmmer/hmmer.tar.gz
Apptainer> tar zxf hmmer.tar.gz
Apptainer> ln -s hmmer*/ src
Apptainer> cd src
Apptainer> ./configure --prefix /opt/hmmer/install
Apptainer> make
Apptainer> make install

Apptainer> exit
The last step before we can use the sandbox normally is to update the permissions again, for all of the new files we just installed:
chmod -R a=rwX myUbuntu
Now, open an interactive session with your user (no --fakeroot). You can use now the container with hmmer ready in a
few steps. Let’s check by printing the help documentation for nhmmer:
apptainer shell myUbuntu

Apptainer> export PATH=$PATH:/opt/hmmer/install/bin
Apptainer> nhmmer -h
# nhmmer :: search a DNA model, alignment, or sequence against a DNA database
# HMMER 3.4 (Aug 2023); http://hmmer.org/
# Copyright (C) 2023 Howard Hughes Medical Institute.
# Freely distributed under the BSD open source license.
# - - - - - - - - - - - - - - - - - - - - - - - - - - - - - - - - - - - -
Usage: nhmmer [options] <query hmmfile|alignfile|seqfile> <target seqfile>

Basic options:
  -h : show brief help on version and usage

Options directing output:
  -o <f>             : direct output to file <f>, not stdout
  -A <f>             : save multiple alignment of all hits to file <f>
  --tblout <f>       : save parseable table of hits to file <f>
  --dfamtblout <f>   : save table of hits to file, in Dfam format <f>
  --aliscoresout <f> : save scores for each position in each alignment to <f>
  --hmmout <f>       : if input is alignment(s), write produced hmms to file <f>
  --acc              : prefer accessions over names in output
  --noali            : don't output alignments, so output is smaller
  --notextw          : unlimit ASCII text output line width
  --textw <n>        : set max width of ASCII text output lines  [120]  (n>=120)

Options controlling scoring system:
  --singlemx    : use substitution score matrix w/ single-sequence MSA-format inputs
  --popen <x>   : gap open probability  [0.03125]  (0<=x<0.5)
  --pextend <x> : gap extend probability  [0.75]  (0<=x<1)
  --mxfile <f>  : read substitution score matrix from file <f>

Options controlling reporting thresholds:
  -E <x> : report sequences <= this E-value threshold in output  [10.0]  (x>0)
  -T <x> : report sequences >= this score threshold in output

Options controlling inclusion (significance) thresholds:
  --incE <x> : consider sequences <= this E-value threshold as significant  [0.01]  (x>0)
  --incT <x> : consider sequences >= this score threshold as significant
...
Notice that we need to update the environment variable PATH in order to use hmmer.
We will automate this in the next section.
Execute Python with PyROOT available
Build a container to use uproot in Python 3.9.
Solution
Start from the Python 3.9 Docker image and create the
myPythonsandbox:apptainer build --sandbox myPython docker://python:3.9 apptainer shell myPythonOnce inside the container, you can install Uproot.
Apptainer> python3 -m pip install --upgrade pip
Apptainer> python3 -m pip install uproot awkward
Exit the container and use it as you like:
apptainer exec myPython python -c "import uproot; print(uproot.__doc__)"Uproot: ROOT I/O in pure Python and NumPy. ...Notice how we did not need neither
--writablenor--fakerootfor the installation, but everything worked fine since pip installs user packages in the user $HOME directory. In addition, Apptainer by default mounts the user home directory as read+write, even if the container is read-only. This is why a sandbox is great to test and experiment locally, but should not be used for containers that will be shared or deployed. Manual changes and local directories are difficult to reproduce and control. Once you are happy with the content, you should use definition files, described in the next episode.
Key Points
The command
buildis the basic tool for the creation of containers.A sandbox is a writable directory where containers can be built interactively.
Superuser permissions are required to build containers if you need to install packages or manipulate the operating system.
Use interactive builds only for development and tests, use definition files for production or publicly distributed containers.
Containers from definition files
Overview
Teaching: 40 min
Exercises: 30 minQuestions
How to easily build and deploy containers from a single definition file?
Objectives
Create a container from a definition file.
As shown in the previous chapter, building containers with an interactive session may take several steps, and it can
become as complicated as the setup is needed.
An Apptainer definition file provides an easy way to build and deploy containers. The same advice for using local storage applies here, and we will be using the same /tmp location that we allocated in the sandbox episode.
Hello World Apptainer
The following recipe shows how to build a hello-world container, and run the container on your local computer.
-
Step 1: Open a text editor (e.g., nano, vim, or gedit in a graphical environment)
vim hello-world.def -
Step 2: Include the following script in the
hello-world.deffile to define the environmentBootStrap: docker From: ubuntu:20.04 %runscript echo "Hello World" # Print Hello world when the image is loadedIn the above script, the first line -
BootStrap: dockerindicates that apptainer will use the docker protocol to retrieve the base OS to start the image. TheFrom: ubuntu:20.04is given to apptainer to start from a specific image/OS in Docker Hub. Any content within the%runscriptwill be written to a file that is executed when one runs the apptainer image. Theecho "Hello World"command will print theHello Worldon the terminal. Finally the#hash is used to include comments within the definition file. -
Step 3: Build the image
apptainer build hello-world.sif hello-world.defThe
hello-world.siffile specifies the name of the output file that is built when using theapptainer buildcommand. -
Step 4: Run the image
./hello-world.sif
Deleting Apptainer image
To delete the hello-world Apptainer image, simply delete the hello-world.sif file.
apptainer deleteNote that there is also a
apptainer deletecommand, but it is to delete an image from a remote library. To learn more about using remote endpoints and pulling and pushing images from or to libraries, read Remote Endpoints and Library API Registries.
Example of a more elaborate definition file
Let’s look at the structure of the definition file with another example. Let’s prepare a container from an official Ubuntu image, but this time we will install hmmer in an automated way.
Adapting our sandbox procedure to the definition file will look like:
BootStrap: docker
From: ubuntu:20.04

%post
        apt update && apt install build-essential wget -y

        mkdir /opt/hmmer && cd /opt/hmmer
        wget http://eddylab.org/software/hmmer/hmmer.tar.gz
        tar zxf hmmer.tar.gz
        ln -s hmmer*/ src
        cd src
        ./configure --prefix=/opt/hmmer/install
        make
        make install

%environment
        export PATH=$PATH:/opt/hmmer/install/bin


%runscript
        nhmmer -h

%labels
    Author dunn0404
    Version v0.0.1

%help
    Example container running the nhmmer help documentation
Let’s take a look at the definition file:
- The first two lines define the base image. In this case, the image
ubuntu:20.04from Docker Hub is used. %postare lines to execute inside the container after the OS has been set. In this example, we are listing the steps that we would follow to install ROOT with a precompiled binary in an interactive session. Notice that the binary used corresponds with the Ubuntu version defined at the second line.%environmentis used to define environment variables available inside the container. Here we are setting the env variables required to execute ROOT and PyROOT.- Apptainer containers can be executable.
%runscriptdefine the actions to take when the container is executed. To illustrate the functionality, we will just runnhmmer -hto print the help text fornhmmer. %labelsadd custom metadata to the container.%helpit is the container documentation: what it is and how to use it. Can be displayed usingapptainer run-help
Save this definition file as hmmerInUbuntu.def. To build the container, just provide the definition file as argument
(executing as superuser):
apptainer build hmmerInUbuntu.sif hmmerInUbuntu.def
Then, an interactive shell inside the container can be initialized with apptainer shell, or
a command executed with apptainer exec. A third option is execute the actions defined inside %runscript
simply by calling the container as an executable
./hmmerInUbuntu.sif
# nhmmer :: search a DNA model, alignment, or sequence against a DNA database
# HMMER 3.4 (Aug 2023); http://hmmer.org/
# Copyright (C) 2023 Howard Hughes Medical Institute.
# Freely distributed under the BSD open source license.
# - - - - - - - - - - - - - - - - - - - - - - - - - - - - - - - - - - - -
Usage: nhmmer [options] <query hmmfile|alignfile|seqfile> <target seqfile>

Basic options:
  -h : show brief help on version and usage

Options directing output:
  -o <f>             : direct output to file <f>, not stdout
  -A <f>             : save multiple alignment of all hits to file <f>
  --tblout <f>       : save parseable table of hits to file <f>
  --dfamtblout <f>   : save table of hits to file, in Dfam format <f>
  --aliscoresout <f> : save scores for each position in each alignment to <f>
  --hmmout <f>       : if input is alignment(s), write produced hmms to file <f>
  --acc              : prefer accessions over names in output
  --noali            : don't output alignments, so output is smaller
  --notextw          : unlimit ASCII text output line width
  --textw <n>        : set max width of ASCII text output lines  [120]  (n>=120)
...
If we like the results, we need to be sure to save the SIF format image to somewhere permanent, like our home directory. If we don’t it will be deleted alongside the other contents of /tmp when the job ends.
cp hmmerInUbuntu.sif ~/
Here we have covered the basics with a few examples selected to highlight the Apptainer fundamentals. Check the Apptainer docs to see all the available options and more details related to the container creation.
A few best practices for your containers to make them more usable, portable, and secure:
- Always install packages, programs, data, and files into operating system locations (e.g. not
/home,/tmp, or any other directories that might get commonly binded on). - Document your container. If your runscript doesn’t supply help, write a
%helpor%apphelpsection. A good container tells the user how to interact with it. - If you require any special environment variables to be defined, add them to the
%environmentand%appenvsections of the build recipe. - Files should always be owned by a system account (UID less than 500).
- Ensure that sensitive files like
/etc/passwd,/etc/group, and/etc/shadowdo not contain secrets. - Build production containers from a definition file instead of a sandbox that has been manually changed. This ensures the greatest possibility of reproducibility and mitigates the “black box” effect.
Deploying your containers
Keep in mind that, while building a container may be time consuming, the execution can be immediate and anywhere your image is available. Once your container is built with the requirements of your analysis, you can deploy it in a large cluster and execute it as far as Apptainer is available on the site.
Libraries like Sylabs Cloud Library ease the distribution of images. Organizations like OSG provide instructions to use available images and distribute custom images via CVMFS.
Be smart, and this will open endless possibilities in your workflow.
Write a definition file to build a container with Pythia8 available in Python
Following the example of the first section in which a container is built with an interactive session, write a definition file to deploy a container with Pythia8 available.
Take a look at
/opt/pythia/pythia8307/examples/main01.pyand define the%runscriptto execute it usingpython3.(Tip: notice that main01.py requires
Makefile.inc).Solution
BootStrap: docker
From: centos:centos7

%post
    yum -y groupinstall 'Development Tools'
    yum -y install python3-devel
    mkdir /opt/pythia && cd /opt/pythia
    curl -o pythia8307.tgz https://pythia.org/download/pythia83/pythia8307.tgz
    tar xvfz pythia8307.tgz
    cd pythia8307
    ./configure --with-python-include=/usr/include/python3.6m/
    make

%environment
    export PYTHONPATH=/opt/pythia/pythia8307/lib:$PYTHONPATH
    export LD_LIBRARY_PATH=/opt/pythia/pythia8307/lib:$LD_LIBRARY_PATH

%runscript
    cp /opt/pythia/pythia8307/Makefile.inc .
    python3 /opt/pythia/pythia8307/examples/main01.py

%labels
    Author HEPTraining
    Version v0.0.1

%help
    Container providing Pythia 8.307. Execute the container to run an example.
    Open it in a shell to use the Pythia installation with Python 3.6
Build your container executing
apptainer build pythiaInCentos7.sif myPythia8.defAnd finally, execute the container to run
main01.py./pythiaInCentos7.sif
Key Points
An Apptainer definition file provides an easy way to build and deploy containers.
Sharing files between host and container
Overview
Teaching: 30 min
Exercises: 0 minQuestions
How to read and write files on the host system from within the container?
Objectives
Map directories on your host system to directories within your container.
Learn about the bind paths included automatically in all containers.
One of the key features about containers is the isolation of the processes running inside them. It means, files on the host system are not accessible within the container. However, it is very common that some files on the host system are needed inside the container, or you want to write files from the container to some directory in the host.
We have already used the option --bind earlier in the module when exploring the options available to run Apptainer
containers. In this chapter we will explore further options to bind directories from your host system to directories
within your container.
Remember that in Apptainer, your user outside is the same inside the container (except when using fakeroot). And the same happens with permissions and ownership for files in bind directories.
Bind paths included by default
For each container executed, Apptainer binds automatically some directories by default, and other defined by the system admin in the Apptainer configuration. By default, Apptainer binds:
- The user’s home directory ($HOME)
- The current directory when the container is executed ($PWD)
- System-defined paths:
/tmp,/proc,/dev, etc. Since this is defined in the configuration, it may vary from site to site.
Let’s use for example the container built during the last chapter called hmmerInUbuntu.sif. Take a look at your
current directory
pwd
/home/myuser/somedirectory
Open a shell inside the container and try to use pwd again
apptainer shell hmmerInUbuntu.sif

Apptainer> pwd
/home/myuser/somedirectory
you will notice that the files stored on the host are located inside the container! As we explained above, Apptainer
mounts automatically your $HOME inside the container.
Disabling system binds
If for any reason you want to execute a container removing the default binds, the command-line option
--no-mountis available. For example, to disable the bind of/tmprun --no-mount tmp my_container.sif
Try this time with
apptainer shell --no-mount home hmmerInUbuntu.sif
and you will notice that $HOME is not mounted anymore
ls /home/myuser
ls: cannot access '/home/myuser': No such file or directory
User-defined bind paths
Apptainer provides mechanisms to specify additional binds when executing a container via command-line or environment variables. Apptainer offers a complex set of mechanism for binds or other mounts. Here we present the main points, refer to the Bind Paths and Mounts documentation for more.
Bind with command-line options
The command-line option --bind (-B) will specify the directories that must be linked between the
host and the container. It is available for run, exec and shell (as well for instance that is
not covered yet).
The syntax for using the bind option is "source:destination", and the paths must be absolute (relative
paths will be rejected). For example, let’s create a directory in the host containing a constant that can be useful
for your analysis
mkdir $HOME/mydata
echo "MUONMASS=105.66 MeV" > $HOME/mydata/muonMass.txt
It is very, very important in your analysis workflow to know the mass of the muon, right? It may have sense to put the data
in a high-level directory within the container, like /data
apptainer shell --bind $HOME/mydata:/data hmmerInUbuntu.sif
This will bind the directory mydata/ from the host as /data inside the container:
ls -l /data
-rw-rw-r-- 1 myuser myuser 20 Jan 2 12:46 muonMass.txt
Now you can use the mass of the muon from a root-level directory!
If multiple directories must be available in the container, you can repeat the option or they can be defined with a comma between each pair of directories,
i.e. using the syntax source1:destination1,source2:destination2.
Also. If the destination is not specified, it will be set as equal as the source. For example
apptainer shell --bind /scratch.global hmmerInUbuntu.sif
Will mount /scratch.global inside the container. Try it!
Binding directories with Docker-like syntax using
--mountThe flag –mount provides a method to bind directories using the syntax of Docker. The bind is specified with the format
type=bind,src=<source>,dst=<dest>. Currently, onlytype=bindis supported. Check the documentation for additional options available.
Bind with environment variables
If the environment variable $APPTAINER_BIND is defined, apptainer will bind inside ANY container
the directories specified in the format source, with the destination being optional (in the same way as using
--bind). For example:
export APPTAINER_BIND="/scratch.global"
will bind global scratch to all your Apptainer containers (/scratch.global must be available in the host, of course).
You can also bind multiple directories using commas between each source:destination.
Key Points
Bind mounts allow reading and writing files within the container.
In Apptainer, you have same owner and permissions for files inside and outside the container.
Some paths are mounted by default by Apptainer.
Additional directories to bind can be defined using the
--bindoption or the environment variable$SINGULARITY_BIND.
Running jobs using Apptainer containers
Overview
Teaching: 30 min
Exercises: 40 minQuestions
How do I set up and run a SLURM job from a Apptainer container?
How do I set up and run an parallel MPI job from a Apptainer container?
Objectives
Learn how MPI applications within Apptainer containers can be run on HPC platforms
Understand the challenges and related performance implications when running MPI jobs via Apptainer
Running SLURM jobs that use Apptainer containers
In the most basic case, including Apptainer in your SLURM job won’t look very different than what we have been doing interactively so far. For completeness, and so we can see it all at once, let’s look at a SLURM batch script that will run the nhmmer image we created earlier.
#!/bin/bash
#SBATCH --time=00:30:00
#SBATCH --ntasks=1
#SBATCH --mem=10g
#SBATCH --tmp=10g

module load apptainer
apptainer exec ~/hmmerInUbuntu.sif nhmmer -h
Things can get a little more complicated for workflows that deviate from this pattern, so let’s take a look at MPI parallel workflows below, and instance-based workflows in the next episode.
Running GPU-accelerated codes via CUDA with Apptainer containers
CUDA Overview
CUDA - Compute Device Unified Architecture - is a proprietary parallel computing platform developed by NVIDIA, primarily for use with their GPUs to allow acceleration of specific computing tasks. CUDA provides an interface that allows programmers to distribute eligible tasks in parallel to the GPU hardware, which can provide significant speedups over traditional CPU-based computing in certain applications.
CUDA codes with Apptainer containers
The primary change that needs to be made for CUDA-capable codes to run inside of a container is to make an appropriate GPU visible to the container. Luckily, this is such a common task for container-based workflows that apptainer provides a single command-line option that works for us in most cases.
In order to use CUDA in this way, we first need to request a SLURM job with GPU resources. For an example job that wants to run on a single A100 GPU preamble to such a SLURM script will looks like the following.
#!/bin/bash
#SBATCH --time=00:30:00
#SBATCH --ntasks=1
#SBATCH --mem=10g
#SBATCH --tmp=10g
#SBATCH --partition=a100-4
#SBATCH --gres=gpu:a100:1
Note that we have added two lines here. One specifying the partition where the job will run, and a second specifying the type and number of GPUs we want for this job. You can read more about what kind of GPUs are available and how to access them at MSI’s page describing the available system partitions.
With the job script appropriately modified to request a GPU, we are now able to look at how to make apptainer aware of the GPU. Let’s use a container for the GROMACS software, a molecular-dynamics code that can offload part of the simulation work to GPUs, as our example. NVIDIA provides a container for GROMACS, and a variety of other software, via their NGC Catalog.
apptainer pull docker://nvcr.io/hpc/gromacs:2023.2
This gives us an image file called gromacs\_2023.2.sif. Using this inside of our GPU-enabled job would then look like:
#!/bin/bash
#SBATCH --time=00:30:00
#SBATCH --ntasks=1
#SBATCH --mem=10g
#SBATCH --tmp=10g
#SBATCH --partition=a100-4
#SBATCH --gres=gpu:a100:1

module load apptainer
apptainer run --nv gromacs_2023.2.sif gmx mdrun -h
The key addition here is the use of the --nv option for apptainer run, which passes all available NVIDIA GPUs into the container. It works in the same way for exec, shell, and other commands that execute commands inside the container.
In most cases that is all you need to do. Occasionally, you may need to hint or limit the GPU devices that are available to the container. Apptainer interacts with this information via environment variables. For instance, if you are running a complex pipeline where your job requests multiple GPUs but you want to run a specific step using a container on a single GPU, you can indicate which GPU should be used by its index. NVIDIA GPUs on a system are indexed starting from zero, and you can see the indices for the GPUs available in your current session by running nvidia-smi.
#!/bin/bash
#SBATCH --time=00:30:00
#SBATCH --ntasks=1
#SBATCH --mem=10g
#SBATCH --tmp=10g
#SBATCH --partition=a100-4
#SBATCH --gres=gpu:a100:4

module load apptainer
APPTAINER_CUDA_VISIBLE_DEVICES=0 apptainer run --nv gromacs_2023.2.sif gmx mdrun -h
If you wanted to use two GPUs for this step, you could modify that final line to look like:
APPTAINER_CUDA_VISIBLE_DEVICES=0,1 apptainer run --nv gromacs_2023.2.sif gmx mdrun -h
Running MPI parallel codes with Apptainer containers
MPI overview
MPI - Message Passing Interface - is a widely used standard for parallel programming. It is used for exchanging messages/data between processes in a parallel application. If you’ve been involved in developing or working with computational science software, you may already be familiar with MPI and running MPI applications.
When working with an MPI code on a large-scale cluster, a common approach is to compile the code yourself, within your own user directory on the cluster platform, building against the supported MPI implementation on the cluster. Alternatively, if the code is widely used on the cluster, the platform administrators may build and package the application as a module so that it is easily accessible by all users of the cluster.
MPI codes with Apptainer containers
If our target platform uses OpenMPI, one of the two widely used source MPI implementations, we can build/install a compatible OpenMPI version within the image as part of the image build process. We can then build our code that requires MPI, either interactively in an image sandbox or via a definition file.
If the target platform uses a version of MPI based on MPICH, the other widely used open source MPI implementation, there is ABI compatibility between MPICH and several other MPI implementations. In this case, you can build MPICH and your code within an image sandbox or as part of the image build process via a definition file, and you should be able to successfully run containers based on this image on your target cluster platform.
MSI has both OpenMPI and MPICH options available, so the best choice here will depend on your specific workflow and the aparallel code you want to run.
As described in Apptainer’s MPI documentation, support for both OpenMPI and MPICH is provided. Instructions are given for building the relevant MPI version from source via a definition file and we’ll see this used in an example below.
Container portability and performance on HPC platforms
While building a container on one system that is intended for use on another, remote HPC platform does provide some level of portability, if you’re after the best possible performance, it can present some issues. The version of MPI in the container will need to be built and configured to support the hardware on your target platform if the best possible performance is to be achieved. Where a platform has specialist hardware with proprietary drivers, building on a different platform with different hardware present means that building with the right driver support for optimal performance is not likely to be possible. This is especially true if the version of MPI available is different (but compatible). Apptainer’s MPI documentation highlights two different models for working with MPI codes. The hybrid model that we’ll be looking at here involves using the MPI executable from the MPI installation on the host system to launch apptainer and run the application within the container. The application in the container is linked against and uses the MPI installation within the container which, in turn, communicates with the MPI daemon process running on the host system. In the following section we’ll look at building am Apptainer image containing a small MPI application that can then be run using the hybrid model.
Building and running an Apptainer image for an MPI code
Building and testing an image
We’ll build an image from a definition file. Containers based on this image will print a ‘Hello world” message based on the available parallel resources.
Begin by creating a file called mpitest.c in your current directory with the contents:
#include <mpi.h>
#include <stdio.h>
#include <stdlib.h>

int main (int argc, char **argv) {
        int rc;
        int size;
        int myrank;

        rc = MPI_Init (&argc, &argv);
        if (rc != MPI_SUCCESS) {
                fprintf (stderr, "MPI_Init() failed");
                return EXIT_FAILURE;
        }

        rc = MPI_Comm_size (MPI_COMM_WORLD, &size);
        if (rc != MPI_SUCCESS) {
                fprintf (stderr, "MPI_Comm_size() failed");
                goto exit_with_error;
        }

        rc = MPI_Comm_rank (MPI_COMM_WORLD, &myrank);
        if (rc != MPI_SUCCESS) {
                fprintf (stderr, "MPI_Comm_rank() failed");
                goto exit_with_error;
        }

        fprintf (stdout, "Hello, I am rank %d/%d\n", myrank, size);

        MPI_Finalize();

        return EXIT_SUCCESS;

 exit_with_error:
        MPI_Finalize();
        return EXIT_FAILURE;
}
In the same directory, save the following definition file content to a .def file, e.g. ompi_example.def:
Bootstrap: docker
From: ubuntu:20.04

%files
    mpitest.c /opt

%environment
    # Point to OMPI binaries, libraries, man pages
    export OMPI_DIR=/opt/ompi
    export PATH="$OMPI_DIR/bin:$PATH"
    export LD_LIBRARY_PATH="$OMPI_DIR/lib:$LD_LIBRARY_PATH"
    export MANPATH="$OMPI_DIR/share/man:$MANPATH"

%post
    echo "Installing required packages..."
    apt update && apt install -y wget rsh-client build-essential

    echo "Installing Open MPI"
    export OMPI_DIR=/opt/ompi
    export OMPI_VERSION=4.1.5
    export OMPI_URL="https://download.open-mpi.org/release/open-mpi/v4.1/openmpi-$OMPI_VERSION.tar.bz2"
    mkdir -p /tmp/ompi
    mkdir -p /opt
    # Download
    cd /tmp/ompi && wget -O openmpi-$OMPI_VERSION.tar.bz2 $OMPI_URL && tar -xjf openmpi-$OMPI_VERSION.tar.bz2
    # Compile and install
    cd /tmp/ompi/openmpi-$OMPI_VERSION && ./configure --prefix=$OMPI_DIR && make -j8 install

    # Set env variables so we can compile our application
    export PATH=$OMPI_DIR/bin:$PATH
    export LD_LIBRARY_PATH=$OMPI_DIR/lib:$LD_LIBRARY_PATH

    echo "Compiling the MPI application..."
    cd /opt && mpicc -o mpitest mpitest.c
    cp mpitest /bin
A quick overview of what the above definition file is doing:
- The image is being bootstrapped from the
ubuntu:20.04Docker image. - In the
%filessection: The MPI “Hello world” test is copied from the current directory into the/optdirectory within the image. - In the
%environmentsection: Set a couple of environment variables that will be available within all containers run from the generated image. - In the
%postsection:- Ubuntu’s
aptpackage manager is used to update the package directory and then install the compilers and other libraries required for the OMPI build. - The OMPI .tar.bz2 file is extracted and the configure, build and install steps are run.
- The environment is set up to use the newly installed OMPI, and we build our “Hello world” example.
- Ubuntu’s
Build and test the image
Using the above definition file, build an Apptainer image named
ompi_example.sif.Once the image has finished building, test it by running the
mpitestprogram that we built.Solution
You should be able to build an image from the definition file as follows:
$ apptainer build ompi_example.sif ompi_example.defLet’s begin with a single-process run of
mpitestto ensure that we can run the container as expected. We’ll use the MPI installation within the container for this test. Note that when we run a parallel job on an HPC cluster platform, we use the MPI installation on the cluster to coordinate the run so things are a little different…Start a shell in the Apptainer container based on your image and then run a single process job via
mpirun:$ apptainer shell ompi_example.sif Apptainer> mpirun -np 1 mpitestYou should see output similar to the following:
Hello, I am rank 0/1
Running Apptainer containers via MPI
Assuming the above tests worked, we can now try undertaking a parallel run within our container image.
This is where things get interesting and we’ll begin by looking at how Apptainer containers are run within an MPI environment.
If you’re familiar with running MPI codes, you’ll know that you use mpirun (as we did in the previous example), mpiexec or a similar MPI executable to start your application. This executable may be run directly on the local system or cluster platform that you’re using, or you may need to run it through a job script submitted to a job scheduler. Your MPI-based application code, which will be linked against the MPI libraries, will make MPI API calls into these MPI libraries which in turn talk to the MPI daemon process running on the host system. This daemon process handles the communication between MPI processes, including talking to the daemons on other nodes to exchange information between processes running on different machines, as necessary.
When running code within an Apptainer container, we don’t use the MPI executables stored within the container (i.e. we DO NOT run apptainer exec mpirun -np <numprocs> /path/to/my/executable). Instead we use the MPI installation on the host system to run Apptainer and start an instance of our executable from within a container for each MPI process. Without Apptainer support in an MPI implementation, this results in starting a separate Apptainer container instance within each process. This can present some overhead if a large number of processes are being run on a host. Where Apptainer support is built into an MPI implementation this can address this potential issue and reduce the overhead of running code from within a container as part of an MPI job.
Ultimately, this means that our running MPI code is linking to the MPI libraries from the MPI install within our container and these are, in turn, communicating with the MPI daemon on the host system which is part of the host system’s MPI installation. In the case of OMPI, these two installations of MPI may be different but as long as there is ABI compatibility between the version of MPI installed in your container image and the version on the host system, your job should run successfully.
We can now try running a 2-process MPI run of our test program.
Undertake a parallel run of
mpitest(general example)You should be able to run the example using a command similar to the one shown below. However, if you are not currently inside an interactive SLURM job, you may need to write and submit a job submission script at this point to initiate running of the benchmark.
Also note that due to a peculiarity of how we install OMPI at MSI, we will need to unset OPAL_PREFIX before running a hybrid OMPI+Apptainer job.
unset OPAL_PREFIX
$ mpirun -np 2 apptainer exec ompi_example.sif mpitest
Expected output and discussion
As you can see in the mpirun command shown above, we have called
mpirunon the host system and are passing to MPI theapptainerexecutable for which the parameters are the image file and any parameters we want to pass to the image’s run script, in this case the path/name of the executable to run.Hello, I am rank 1/2 Hello, I am rank 0/2
Key Points
Apptainer images containing MPI applications can be built on one platform and then run on another (e.g. an HPC cluster) if the two platforms have compatible MPI implementations.
When running an MPI application within a Apptainer container, use the MPI executable on the host system to launch an Apptainer container for each process.
Think about parallel application performance requirements and how where you build/run your image may affect that.
Apptainer instances
Overview
Teaching: 60 min
Exercises: 10 minQuestions
How can I keep my container running in the background?
What are the use cases for instances?
Objectives
Run containers in a detached mode to keep services up.
Deploy instances via definition files.
Note: This won’t work on MSI until the rollout of Rocky8 in May, 2024
As we have studied in previous chapters, commands such as run and shell allocate Apptainer
containers in the foreground, stopping any process running inside the container after logout. This behavior
suits the use case of containers for executing interactive commands in a well-defined environment, but there
are cases when running processes in the background is convenient. For example, when a web application like a
Jupyter notebook is deployed inside a container, it is desired to keep the container up while it waits for connections
from the web browser.
Apptainer provides the concept of instances to deploy services in the background. While Docker is a common choice of tool for setting services, Apptainer has the advantage of working without requiring any special permissions (like when you are working in a cluster provided by your university/laboratory). In this chapter we will learn the basics about their capabilities and some use cases as examples.
Instances from image files
To start an instance, Apptainer provides the command instance. To exemplify, let’s pull the CentOS image used
in previous chapters
apptainer pull docker://centos:centos7
The image must be started in the following way:
apptainer instance start centos_centos7.sif mycentos7
In this example, the .sif is the image downloaded from Dockerhub, and mycentos7 is the name that we have
assigned to the instance. Instead of opening a shell session or executing a command, the container is running in
the background.
Confirm that the instance is running using the instance list command
apptainer instance list
INSTANCE NAME    PID      IP    IMAGE
mycentos7        10782          /home/myuser/centos_centos7.sif
To interact with the instance, the commands exec and shell are available. The instance must be referred as
instance://name.
For example, to open a shell inside the CentOS instance:
apptainer shell instance://mycentos7
Remember that exiting the shell instance will not stop the container. For doing so, use instance stop:
apptainer instance stop mycentos7
You can confirm the instance doesn’t exist with instance list.
Instances with bind paths
When starting an instance, the same options for bind directories between the host and the container as running an interactive session are available. For example, if you want a directory mounted inside the instance, use the
--bindoption:apptainer instance start --bind /home/user/mydata:/data centos_centos7.sif mycentos7binding the directory
mydata/from the host as/datainside the instance.
A web server as an instance
One of the main purposes of the Apptainer instances is deploying services with customized environments. Before moving to more complex use cases, let’s start with a basic example: a web service showing a HTML with a message.
Let’s write a basic index.html file as:
<!DOCTYPE html>
<html>
<head>
<title>My awesome service</title>
</head>
<body>
<h1>Hello world!</h1>
<p>If you see this page, my awesome service is up and running.</p>
</body>
</html>
If you are not familiar with HTML take a quick look at the HTML Tutorial, but it is not mandatory. What really matters is having a minimal webpage that our server will show.
Now, let’s prepare a basic web server using Python http.server.
Create a definition file, saved as basicServer.def, which contains:
Bootstrap: docker
From: ubuntu:20.04

%post
    apt-get update -y
    apt-get install -y python3.9

%files
    index.html /tmp/index.html

%startscript
   cd /tmp
   python3.9 -m http.server 8850
If you recall the chapter about definition files,
this definition file will pull the official Ubuntu image from Dockerhub, and will install Python3.9.
In addition, it copies index.html in /tmp inside the container. When the instance starts, commands specified on
%startscript are executed. On this example, http.server will be executed, serving a page in the port 8850 (you can
use any other port if 8850 is busy with another service).
Let’s build an image from the definition. Remember that building images requires either superuser permissions or
using the flag --fakeroot as
apptainer build --fakeroot basicServer.sif basicServer.def
Now, let’s start an instance named myWebService with the image that we just built
apptainer instance start --no-mount tmp basicServer.sif myWebService
Reminder from the previous chapter: with --no-mount tmp we are asking Apptainer to NOT bind /tmp from the host
to the instance (it is mounted by default), we use instead an isolated /tmp inside the instance where index.html has
been copied.
You can confirm in the terminal that the web service is up using curl as
curl http://localhost:8850
<!DOCTYPE html>
<html>
<head>
<title>Welcome to my service!</title>
</head>
<body>
<h1>Hello world!</h1>
<p>If you see this page, my awesome service is up and running.</p>
</body>
</html>
If you are executing Apptainer locally, try to open http://localhost:8850. This approach will also work if you are running Apptainer in an Open OnDemand desktop session, provided you also run the browser inside the session.
Remember to stop the instance once you are done.
Serving a Jupyter notebook with custom environment
As an example of the capabilities of instances as services, let’s extend our definition file to deploy a Jupyter notebook server with a customized environment.
What if we provide a Jupyter notebook ready to use ROOT? If you remember our example from the definition files chapter, at this point it must be almost straightforward:
Bootstrap: docker
From: ubuntu:20.04

%post
    apt-get update -y
    apt-get install -y python3
    apt-get install -y python3-pip
    pip install notebook

    apt-get install wget -y
    export DEBIAN_FRONTEND=noninteractive
    apt-get install dpkg-dev cmake g++ gcc binutils libx11-dev libxpm-dev \
    libxft-dev libxext-dev python libssl-dev libgsl0-dev libtiff-dev -y
    cd /opt
    wget https://root.cern/download/root_v6.22.06.Linux-ubuntu20-x86_64-gcc9.3.tar.gz
    tar -xzvf root_v6.22.06.Linux-ubuntu20-x86_64-gcc9.3.tar.gz

%environment
    export PATH=/opt/root/bin:$PATH
    export LD_LIBRARY_PATH=/opt/root/lib:$LD_LIBRARY_PATH
    export PYTHONPATH=/opt/root/lib

%startscript
   jupyter notebook --port 8850
Save the definition file as jupyterWithROOT.def, and let’s build an image called jupyterWithROOT.sif
apptainer build --fakeroot jupyterWithROOT.sif jupyterWithROOT.def
Now, start an instance named mynotebook with our brand-new image
apptainer instance start jupyterWithROOT.sif mynotebook
and confirm that the instance is up
apptainer instance list
INSTANCE NAME    PID      IP    IMAGE
mynotebook       10720          /home/myuser/jupyterWithROOT.sif
If you go to http://localhost:8850 (with SSH tunneling if needed), you will find out that for security reasons the
Jupyter webapp will ask for an access token. Fortunately, you can get the token listing the URL of active servers using
the jupyter notebook list command. To execute the command inside the instance, use sigularity exec:
apptainer exec instance://notebook jupyter notebook list
Currently running servers:
http://localhost:8850/?token=12asldc9b2084f9b664b39a6246022312bc9c605b :: /home/myHome
Open the URL with the token, and you will be able to see the Jupyter interface. Try to open a new notebook and write in a cell to confirm that ROOT is available:
import ROOT
# Now you can work with PyROOT, creating a histogram for example
h = ROOT.TH1F("myHistogram", "myTitle", 50, -10, 10)
h.FillRandom("gaus", 10000)

c = ROOT.TCanvas("myCanvasName","The Canvas Title",800,600)
h.Draw()
c.Draw()
The bottom line: with any Jupyter notebook that you write, you can provide an Apptainer image that will set the environment required to execute the cells. It doesn’t matter if yourself or someone else comes in one, five, ten years, your code will work independently of the software available in your computer as far as Apptainer is available!
A Jupyter notebook with Uproot available
Can you setup a Jupyter notebook server with Uproot available in Apptainer?
Hint: Uproot can be installed using
pip.Solution
Bootstrap: docker
From: ubuntu:20.04

%post
   apt-get update -y
   apt-get install -y python3
   apt-get install -y python3-pip
   pip install notebook
   pip install uproot

%startscript
  jupyter notebook --port 8850
Confirm that Uproot is available opening a notebook and executing in a cell
import uproot
print(uproot.__doc__)
Key Points
Instances allow to setup services via Apptainer images or definition files.
Code provided in Jupyter notebooks can be accompanied by a Apptainer image with the environment needed for its execution, ensuring the reproducibility of the results.